|
|
|
|
 Hi Imp A wash is a paint that has been watered down until it is opaque or semi see through if you like, when applied they fill panel lines making then darker so the stand out more but the wash will also darken the panels if applied too thickly, so be careful with the application. The best way is to add a coat of wash then let it dry if your happy then leave it if not add more coats until you get the effect you want. Washes can be made up yourself but to keep it all the same hue a large quantity may be needed to be mixed up in one go. That,s why the Vallejo washes are a good bet as there always the same colour ready mixed to apply. Hope I have explained it well enough. Regards Andy Current builds:-C57,Zero, Lamborghini Countach, Caldercraft HMS Agamemnon,Robi,R2-D2, MFH Cobra .
|
|
|
 Rank: Pro   Groups: Registered
Joined: 22/04/2015 Posts: 134 Points: 378 Location: San Diego, CA
|
Okay, I went a little nuts on shades of grey, but whatever :) So I hit up the hobby store and picked up some paints and other needed instruments. I also had a hard time finding a very cheap model that I wanted to practice on so I decided to go with a Battlestar Galactica model. 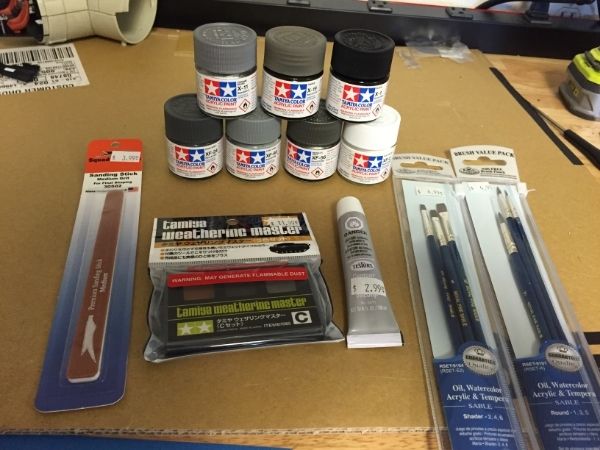 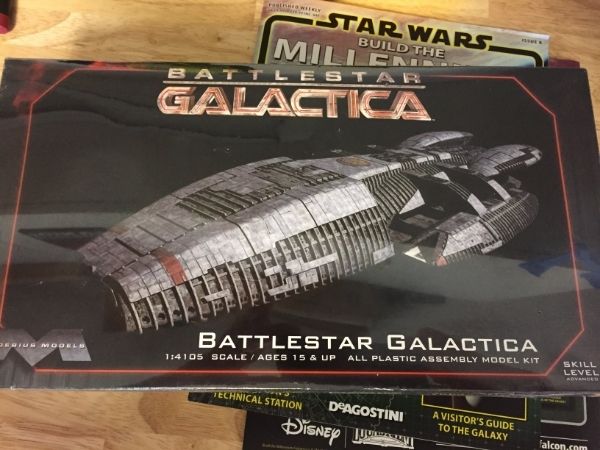 Let the fun begin!!!!! Current Build: Millennium FalconWish List: Lamborghini Countach LP 500S, Red Bull Racing RB7
|
|
|
 Rank: Super-Elite     Groups: Registered
Joined: 17/12/2013 Posts: 3,982 Points: 11,974 Location: NY, USA
|
Great progress so far Impatience.
As far as washes go Games workshop makes some great premade washes.There are 2 of them I recommend Nuln oil and Agrax earthshade. You can get them from Amazon or Games workshop website
They are very thin paints that you apply with a brush and they run into all the recesses on the model and make them look dirty or worn.
Nuln oil is a black wash and looks like dirt once dry
Agrax earthshade is a brown wash and looks like earth/rust when dry.
The good thing about them is they are very thin so the effect is subtle.If you want more weathering you can just keep applying more coats them.
Carl
|
|
|
|
|
Nice gear and have fun  Current builds:-C57,Zero, Lamborghini Countach, Caldercraft HMS Agamemnon,Robi,R2-D2, MFH Cobra .
|
|
|
 Rank: Beginner Level 3 Groups: Registered
Joined: 28/05/2015 Posts: 26 Points: 78 Location: Oklahoma
|
I bought a Battlestar Galactica model to practice on as well... although I ended up with the Mark II Viper.
|
|
|
Rank: Pro  Groups: Registered
Joined: 27/06/2011 Posts: 434 Points: 1,309 Location: milton keynes
|
a good kit to play around with for the washing effect make sure you post some pictures of your progress regards Dan Built - MP4/23, Zero, Deagostini Falcon, Model Airways 1903 Wright Flyer, Senna Mp4/4.
Working - Mclaren M23 1/8th scale to complement the Deagostini MP4/23 & Mp4/4
on the bench, Model Airways Sopwith Camel.
|
|
|
Rank: Beginner Level 1  Groups: Registered
Joined: 31/05/2015 Posts: 5 Points: 18 Location: Mississippi
|
Hey, first time posting anything on here but anyway I got a model to practice on also so hopefully Ill have a lesser chance of messing up my falcon. I like the direction your going to up your experience before starting. I haven't started to put mine together just yet but I will before to much longer and thinking I might need to keep a build diary on here for help and ideas but I've been enjoying watching what everyone is doing on here!!
|
|
|
Rank: Super-Elite Groups: Registered
Joined: 17/12/2013 Posts: 3,982 Points: 11,974 Location: NY, USA
|
Hansyt wrote:Hey, first time posting anything on here but anyway I got a model to practice on also so hopefully Ill have a lesser chance of messing up my falcon. I like the direction your going to up your experience before starting. I haven't started to put mine together just yet but I will before to much longer and thinking I might need to keep a build diary on here for help and ideas but I've been enjoying watching what everyone is doing on here!! Welcome to the forum Hansyt. I am forum support for USA so let me know if I can help in any way. I bought the Hasbro falcon from walmart and I am going to practice painting that .I am sure it will get a few paint jobs before I get brave enough to spray my DeAgostini Falcon. Carl
|
|
|
Rank: Beginner Level 1 Groups: Registered
Joined: 31/05/2015 Posts: 5 Points: 18 Location: Mississippi
|
darbyvet wrote:Hansyt wrote:Hey, first time posting anything on here but anyway I got a model to practice on also so hopefully Ill have a lesser chance of messing up my falcon. I like the direction your going to up your experience before starting. I haven't started to put mine together just yet but I will before to much longer and thinking I might need to keep a build diary on here for help and ideas but I've been enjoying watching what everyone is doing on here!! Welcome to the forum Hansyt. I am forum support for USA so let me know if I can help in any way. I bought the Hasbro falcon from walmart and I am going to practice painting that .I am sure it will get a few paint jobs before I get brave enough to spray my DeAgostini Falcon. Carl Thanks Carl !!!
|
|
|
Rank: Pro Groups: Registered
Joined: 22/04/2015 Posts: 134 Points: 378 Location: San Diego, CA
|
Well folks, today I tried my hand at dry brushing some of the details out as well as using a wash to weather the front seats a bit. Some of it turned out more to my liking than others, but well as I've seen said many times, the Millennium Falcon is a heap of junk so it isn't meant to look perfect heheh. I'm pretty happy with the results of most of the parts for my first time every doing this stuff. Weathered the seats a bit with a Tamiya Smoke (acrylic) paint and water mix. Ended up with a couple bubbles that were hard to get rid of and left spots on the chair (left), but out of what I did today, this is what I'm the most happy with. I used a couple pieces of wood and some Elmer's Tack I got from Michael's to hold things in place for me. 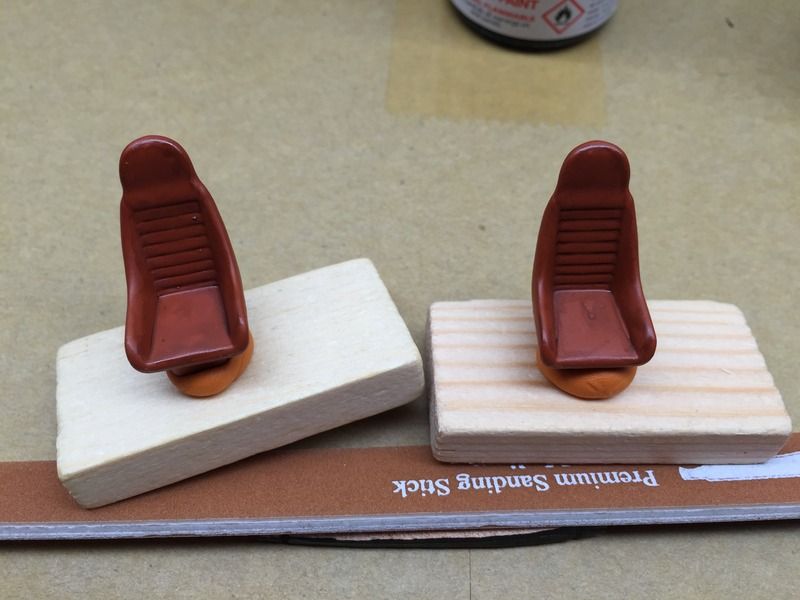 Next I did some dry brushing on the cockpit side panels. I kinda wish it came out a bit brighter. It did on my second one, but I ended up with a lot more paint in the recesses on the other panel, so I decided not to do a second coat/attempt. I was a little upset it dirtied up the white also at first, but in the hour since I did it I've come to enjoy those being a little dirtied/weathered. Dry brushing ain't as easy as it looks!!!! Part of it might be acrylic paint also as it dries on the brush faster and end up sending little particles around? That's just a guess. Not as pronounced as I've seen with others, but I'm good with it. 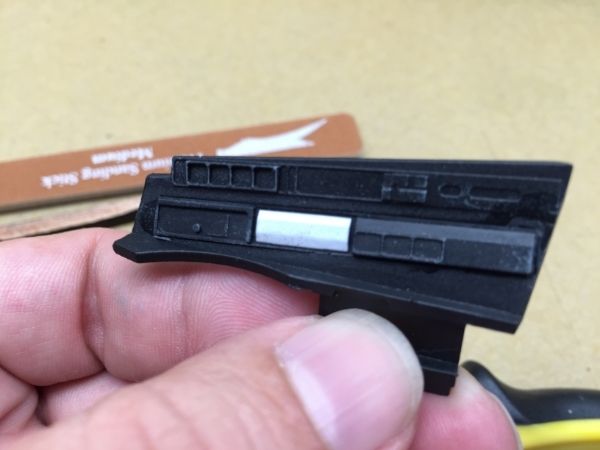 Thirdly, I switched to Tamiya Chrome Silver to do the front panel of the cockpit. Actually doesn't look that great close up in my pic, but standing back from it a bit I like how it looks. IN the close up you can see those particle splatters I was talking about before. I got the effect I was looking for mostly aside from the splatters. Again, you guys make dry brushing look SOOO easy heheheh. I'm happy with this one. 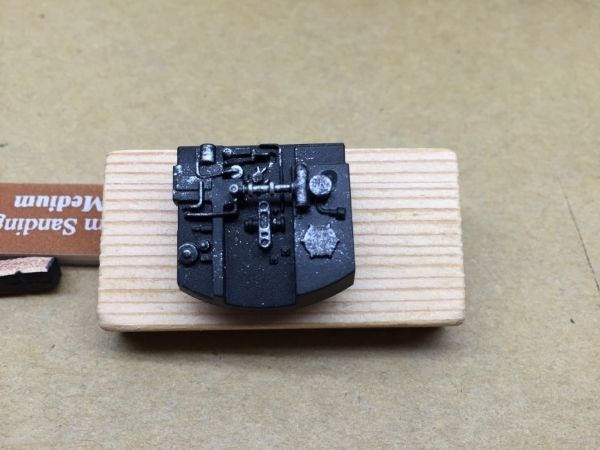 Last I did the center console of the cockpit. I might redo this one in Chrome Silver, but still not sure. This was done with Tamiya Light Grey like the side panels. I went a bit heavier here because I wanted to make the parts look more covered and wanted the center dial thing to stand out more. Thoughts? 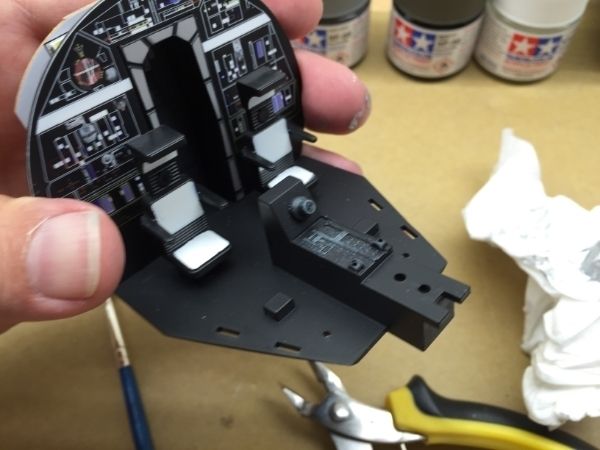 Unless someone comes back with some resounding reason why I should rework any of it, glueing will likely commence later this afternoon or tomorrow morning. Well, at least glueing in those really small handle things (not the flight sticks, but the other little fiddly pieces) cuz they like to spin and fall out. I'm also thinking about weathering the back seats a little. Was considering just using the same Smoke wash that I used for the front seats. Does that sound like it would work to darken them a bit? I also have a Tamiya Weathering kit but have decided to save that for later things. I wanna get the dry brushing and washing skills more honed first. Thanks for watching this episode of Impatience learns to be a modeler!!! Current Build: Millennium FalconWish List: Lamborghini Countach LP 500S, Red Bull Racing RB7
|
|
|
Rank: Beginner Level 1 Groups: Registered
Joined: 31/05/2015 Posts: 5 Points: 18 Location: Mississippi
|
Looks good Impatience, Ive never done any of this before either but I'm going to do pretty much the same thing your doing and looking forward to trying my hand at the dry brushing, just hoping mine turns out as good as yours. Your probably watching him also but out of several youtubers I've been watching, Modelmaking Guru has pretty good videos on that.
|
|
|
 Rank: Semi-Pro Level 1  Groups: Registered
Joined: 17/05/2015 Posts: 61 Points: 189 Location: PIckerington, Ohio USA
|
its looking great Imp, i have never tried dry brushing either, i try to work the piece a lil then clean my brush, seems to help with the paint drying so fast... I have also been watching a lot of Foxx's videos on you tube and his guru site and gives great tips...
Adam
|
|
|
Rank: Pro Groups: Registered
Joined: 22/04/2015 Posts: 134 Points: 378 Location: San Diego, CA
|
Thanks guys for your kind words :) I've decided I'm good with what I've done for the cockpit and have glued everything together (including my fingers a couple of times). Nice to have a piece of this bad boy done!!! 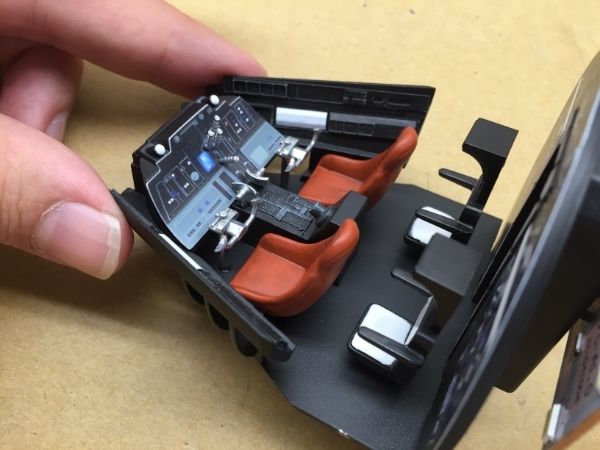 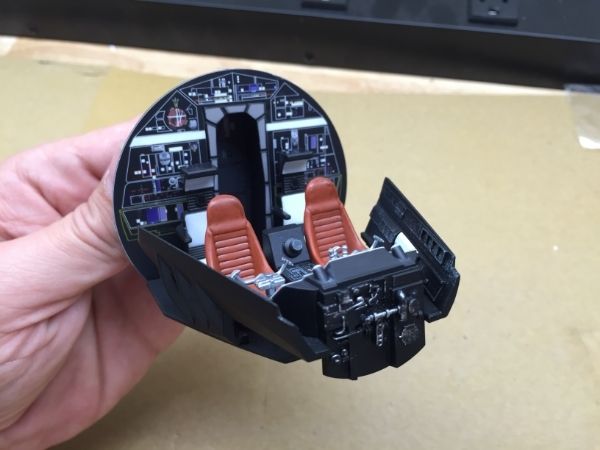 Current Build: Millennium FalconWish List: Lamborghini Countach LP 500S, Red Bull Racing RB7
|
|
|
Rank: Semi-Pro Level 1 Groups: Registered
Joined: 17/05/2015 Posts: 61 Points: 189 Location: PIckerington, Ohio USA
|
looks great, one piece done...hundreds of more to come!!!
Adam
|
|
|
Rank: Pro Groups: Registered
Joined: 22/04/2015 Posts: 134 Points: 378 Location: San Diego, CA
|
So much for one piece done!!! I did a little rework on the cockpit (even with it glued together) as well as lots of work on the, hmm what's it called, bay? So while doing drybrusing in the bay I noticed that the Tamiya Light Grey just really wasn't showing up well, and the Tamiya Chrome Silver was just too much. Luckily, I had also picked up Tamiya Metallic Grey and I fell in love. So, I went ahead and carefully redid dry brushing inside the cockpit with the Metallic Grey as well as the nub in the console between the seats. I AM WAY HAPPIER with the look of the cockpit now. You can compare to previous pictures above: 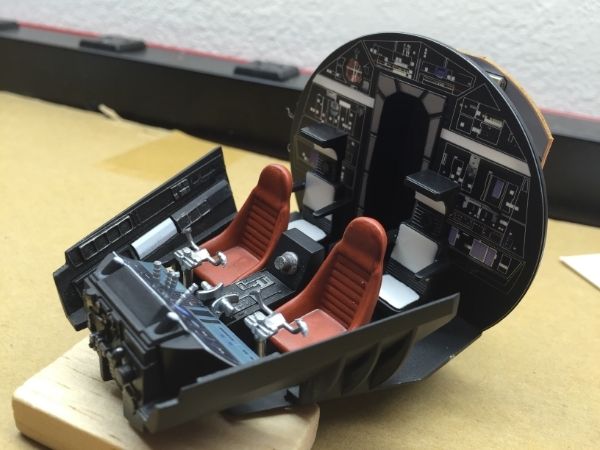 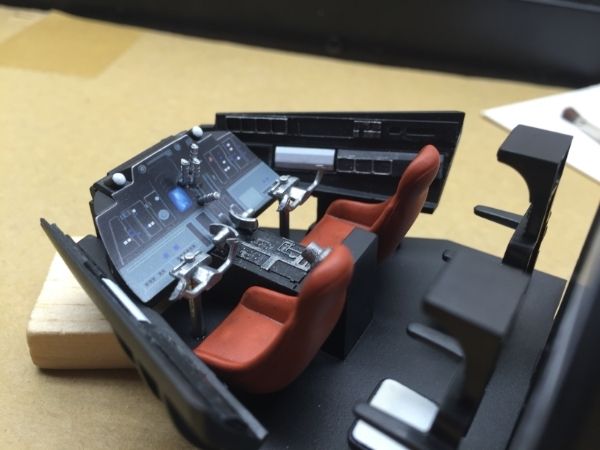 Now, about that floor and bay area. I don't have any in progress pictures unfortunately, but I did learn some things. 1) I masking taped the HELL out of the pieces that sits behind the couch and holds the bed to reduce dry brush strokes getting all over the back and front of the piece, and then used the Metallic Grey after a few other misses with other colors. Then used the suggestion of using the tip of a toothpick to pick out the paint that ended up in the recesses. Very happy with how this turned out. 2) For the floor I tried to follow what the book said about laying a thicker coat of ink in the recesses and then blotting off the top of the floor. This did not work for me. Paper towels and tissues both pulled all the ink out of the lines as well. So instead I used a very thin precise brush to grab up some ink, then rubbed it off a few times on paper towels, then carefully drew into the lines with the brush. This gave me very little extra ink on the floor proper. For the grates I just put a bunch on, let it sit for a bit, then dabbed it off. Will probably do more work on the grates at some point with some Metallic Grey/Silver and perhaps some rust colors. Sorry for the darkness of the last picture below, but if I had it in direct light all the Metallic Grey dry brushing disappeared. You can see on the lower console where I tried to use White paint to dry brush and failed miserably, ohh well, lesson learned and who cares, this ship is supposed to be a mess (I'm learning that bit by bit. 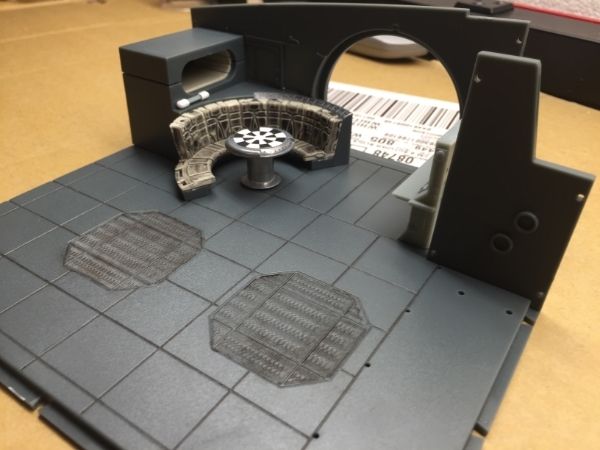  Current Build: Millennium FalconWish List: Lamborghini Countach LP 500S, Red Bull Racing RB7
|
|
|
Rank: Super-Elite Groups: Registered
Joined: 27/01/2014 Posts: 5,060 Points: 14,980
|
Looking really good! If you dont mind can I suggest that you use your fine brush to run around the outside of the cockpit console sticker with a dark paint, this will blend it in a bit better than leaving a white edge
|
|
|
Rank: Pro Groups: Registered
Joined: 22/04/2015 Posts: 134 Points: 378 Location: San Diego, CA
|
davetwin wrote:Looking really good! If you dont mind can I suggest that you use your fine brush to run around the outside of the cockpit console sticker with a dark paint, this will blend it in a bit better than leaving a white edge That is an excellent suggestion!!!  I will do that!! BTW, any other suggestions folks have I'm more than happy to listen to. This is my first crack at a model, so I welcome any help. Really appreciate that Davetwin. Current Build: Millennium FalconWish List: Lamborghini Countach LP 500S, Red Bull Racing RB7
|
|
|
 Rank: Amateur level 2 Groups: Registered
Joined: 01/05/2015 Posts: 43 Points: 132 Location: Clearwater, Florida USA
|
Looking stelar Impatience, I agree that the chrome silver you used really makes the details stand out and match the rest of the control area.
|
|
|
Rank: Pro Groups: Registered
Joined: 22/04/2015 Posts: 134 Points: 378 Location: San Diego, CA
|
Alright so we have received the third months shipment as well as the replacement pack for the missing stickers. Not a huge update this morning, but a few things completed. One step at a time right? Went ahead and put together the console canopy controls piece with stickers. Went together very nicely. The suggestion from the video build to slightly crease the sticker before applying really helped the sticker form nicely. Cut and placed the stickers in the access corridor to the cockpit to block the light from the LED's. It does a pretty good job, but will need to apply some black paint where some of the light still shows through. And of course, I hooked up the lights and put the whole cockpit together to see them. Looks pretty damn sweet if you ask me! I don't think the pictures do it justice as I was having some focusing issues, but they are below none the less. Also followed the suggestion of Davetwin to paint the edges of the console sticker black to cover up the white. Looks MUCH better now, thanks for the suggestion!!! I have not decided if I'm going to start attaching the little seperate exterior pieces yet. The magazine indicates that some instructions on how to paint the exterior of the cockpit module will be coming later. If thats the case I'm thinking I should hold off on attaching any of the exterior little bits. White sticker edges repainted black, looks WAY better. What looks like white still is just shine off the paint, guess I didn't use a flat black, but a gloss black. Whatever, you can't really tell once it is put together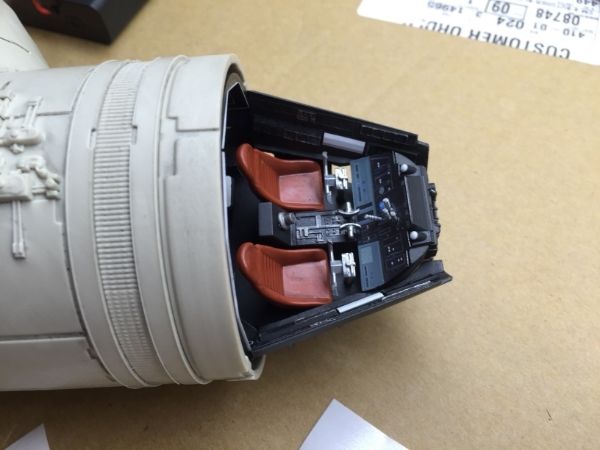 Photo's of the cockpit completely put together with the lights on Photo's of the cockpit completely put together with the lights on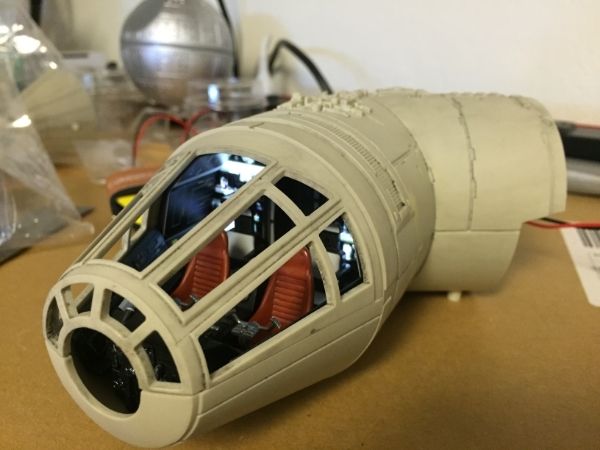  Current Build: Millennium FalconWish List: Lamborghini Countach LP 500S, Red Bull Racing RB7
|
|
|
 Rank: Elite  Groups: registriert, Registered Joined: 20/03/2011 Posts: 2,356 Points: 7,122 Location: UK
|
Coming along nicely Imp your going to love the later issues with all the cushions for the corridors  Spencer
|
|
|
|
Guest
|
 UK
UK

