|
|
 Rank: Beginner Level 3  Groups: Registered
Joined: 08/06/2015 Posts: 27 Points: 90 Location: Texas
|
Lookin great. Thanks for updating with so many photos. Helps to see what everyone is doing. Great work Dad and Husband
Writer for Drafting The Circuits
Radio Host for F1 Racing Plus and Drafting The Circuits
|
|
|
 Rank: Super-Elite      Groups: Registered
Joined: 27/01/2014 Posts: 5,060 Points: 14,980
|
|
|
|
 Rank: Pro  Groups: Registered
Joined: 22/04/2015 Posts: 134 Points: 378 Location: San Diego, CA
|
So, speaking of cushions :) Thanks for the segue everyone...cuz guess what?!?!? CUSHIONS! Issue 10This issue started with 18 little tiny minuscule fiddly fits to fit on the corridor... actually not took bad. Sanding the edges was a bit of a challenge, but needle nose pliers came to the rescue so I wouldn't remove more skin from my finger tips (in addition to the skin removed by superglue). I also fix a couple pieces into the wall indents. The lighter colored one I might use a bit of wash on to darken. The other I used Metallic Grey to pull out the details. Enjoy! 18 little pieces cut and sanded from the sprue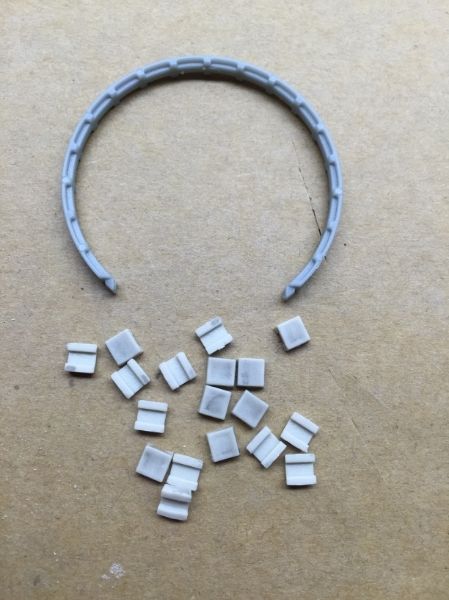 Cushions affixed to the hallway piece Cushions affixed to the hallway piece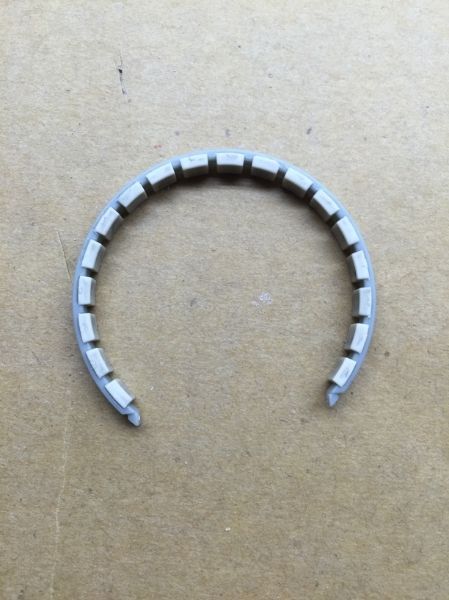 And all glued together, including some extra bits to go in the recesses And all glued together, including some extra bits to go in the recesses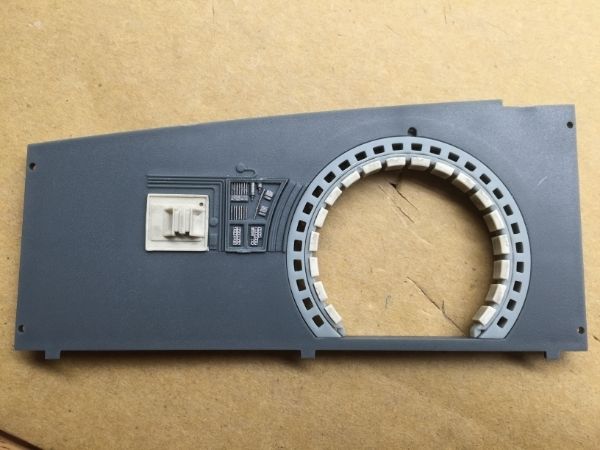 Issue 11 coming soon to a forum near you!!! Current Build: Millennium FalconWish List: Lamborghini Countach LP 500S, Red Bull Racing RB7
|
|
|
Rank: Pro Groups: Registered
Joined: 22/04/2015 Posts: 134 Points: 378 Location: San Diego, CA
|
Thanks Davetwin for checking in. Indeed I have NOT glued any of the cockpit together or its corridor. I'll be leaving that for when I absolutely HAVE to. Current Build: Millennium FalconWish List: Lamborghini Countach LP 500S, Red Bull Racing RB7
|
|
|
Rank: Pro Groups: Registered
Joined: 22/04/2015 Posts: 134 Points: 378 Location: San Diego, CA
|
Chewbacca wrote:Lookin great. Thanks for updating with so many photos. Helps to see what everyone is doing. Great work Glad you like the quantity of photos. Sometimes I wonder if I'm posting too many, but this encourages me to keep doing what I'm doing. Man, this model is such great fun!!! Thanks for checking in! Current Build: Millennium FalconWish List: Lamborghini Countach LP 500S, Red Bull Racing RB7
|
|
|
 Rank: Semi-Pro Level 2 Groups: Registered
Joined: 09/06/2015 Posts: 76 Points: 228 Location: Lancaster, CA
|
Your just cruising along. I like how you weathered the front panel for the flight deck. Tamiya 1/32 P-51D, Revell 1/32 Bf 109G-6 x2 1/32 P-51B, 1/32 Trumpeter Bf109K-4, 1/32 Hasegawa Bf 109E, Testors 1/32 F-117, RMF 1/35 Tiger 1
|
|
|
Rank: Pro Groups: Registered
Joined: 22/04/2015 Posts: 134 Points: 378 Location: San Diego, CA
|
ISSUE 11Issue 11 is all about interior piping in the hold. I decided to paint a few stripes on the piping before putting it in. The colors are not necessarily screen accurate as I didn't have a yellow or orange, and honestly for as little of these paints as I'm using, I don't need to go buy more hehe. I did however pick up some Testor's acrylic red and blue. It definitely adds something even though its not 100% accurate shades or colors. Kinda makes it look like an American Flag ship...  First I tried to use this super thin modeling masking tape I picked up so I could wrap the little pipes and make clean lines in between the pieces. Ya, that was kind of a joke. First the masking tape didn't stick very well, and even after I got it on there the paints bled underneath the tape. This is partially my fault for having a bit too much paint on the brush. Instead, I decided to just hand paint the stripes on with no guides or tape. I used what I learned from dry brushing to get most of the paint off the brush first, which really helped me control the application of the paint stripes. One thing I learned is just how jittery I am. Focus, bring brush near pipe, wait for jittering to put the brush in the place I wanted and QUICK DAB!! Barely even used the tips of the bristles, but I like how it turned out. The little hook pieces that go on the ends of the pipes that curve around the door frame were quite fidly and didn't really want to attach, but after some patience and application of superglue I eventually got them mostly how I wanted them. So here's some pic's of the Issue 11 progress, enjoy! My little stand after painting so the pieces could dry. Up close the lines are a little wiggly, but most of that is hidden once it is put in place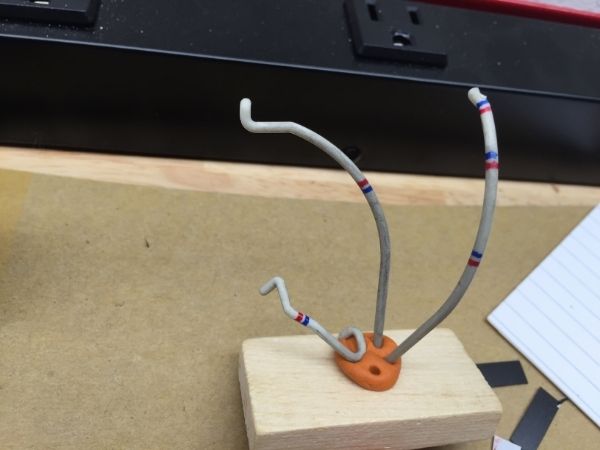 Piping glued into place on the hold wall Piping glued into place on the hold wall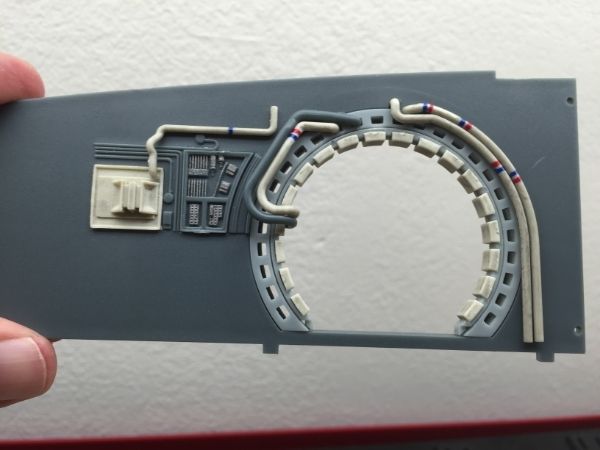 And...a shot of everything together in the hold thats been built, glued, painted, or weathered so far. Feels like its really coming together. And the few little bits of customization really make it feel like its mine And...a shot of everything together in the hold thats been built, glued, painted, or weathered so far. Feels like its really coming together. And the few little bits of customization really make it feel like its mine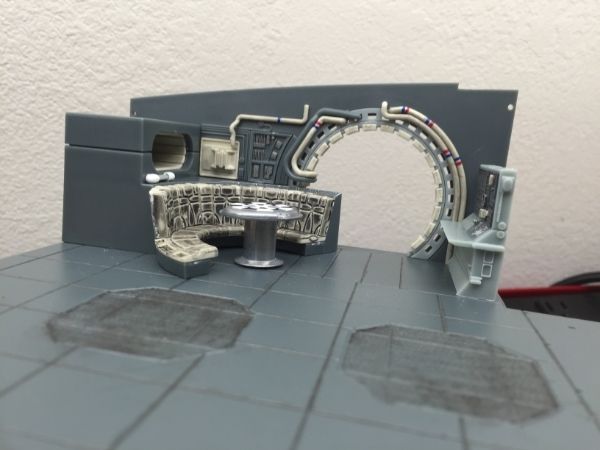 Current Build: Millennium FalconWish List: Lamborghini Countach LP 500S, Red Bull Racing RB7
|
|
|
Rank: Pro Groups: Registered
Joined: 22/04/2015 Posts: 134 Points: 378 Location: San Diego, CA
|
ISSUE 12So this is the first time you actually need to open Issues 10, 11, or 12. Everything in those magazines is for things in previous issues. Now to wrap this stuff up. First off... WARNING!!! WARNING!! WARNING!! There are two different types of brass screws with different thread counts. I found this out the hard way after screws started popping out of the braces. You want to use the one with the tighter (higher) thread count (TOP SCREW): 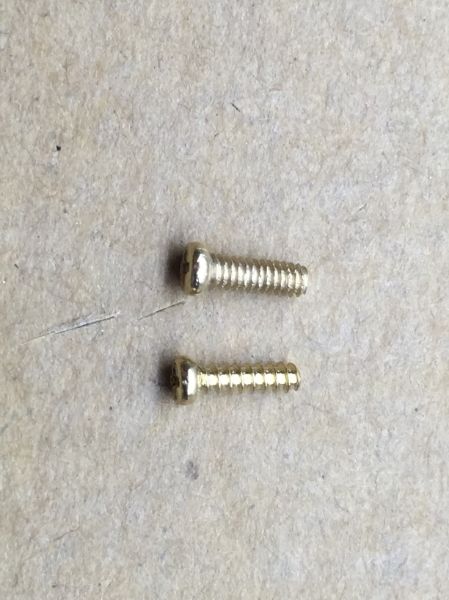 Other than that, everything went together really smoothly. Its a bit of a tight fit getting the panels in place. I might go through and loosen some of the screws, put the panels in place, and then tighten everything. I'm sure as it comes together towards the end there will be a lot of small adjustments. 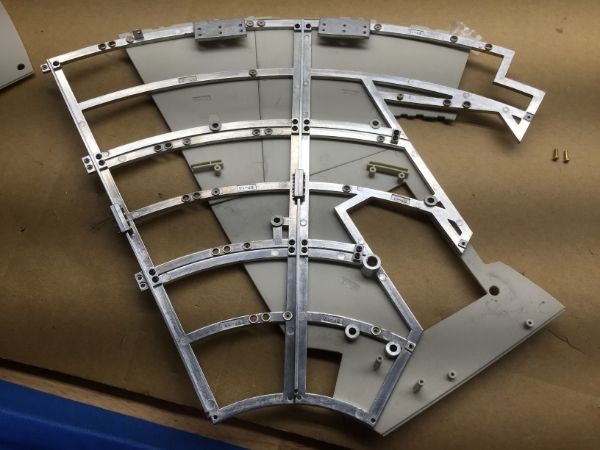 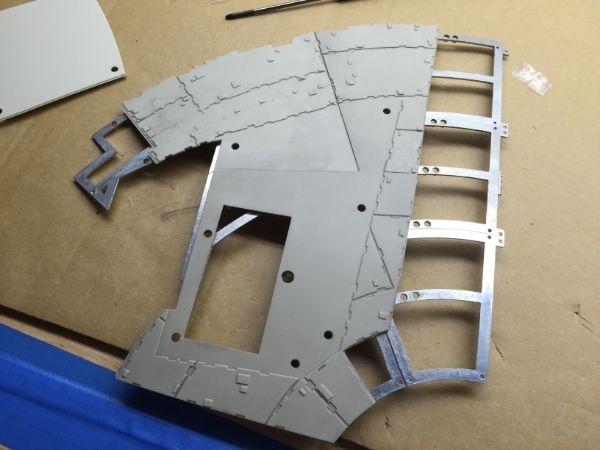 Well, that's pretty much it for this month. I think I'm gonna call DeAgostini and see if I can get the next shipment quicker since I'm behind a bunch of other folks. I've seen others say they have done this. Hmm, of course I'm actually out of town most of July so maybe I don't want to do that...I'll have to ponder this :) Current Build: Millennium FalconWish List: Lamborghini Countach LP 500S, Red Bull Racing RB7
|
|
|
Rank: Semi-Pro Level 1  Groups: Registered
Joined: 17/05/2015 Posts: 61 Points: 189 Location: PIckerington, Ohio USA
|
Imp, the Model is looking great!!! great pics and updates!!!
Adam
|
|
|
Rank: Beginner Level 2  Groups: Registered
Joined: 11/07/2015 Posts: 10 Points: 30
|
Looking Great Impatience! Still debating myself as to how custom I'm wanting to go with the build... The cockpit is a go for mods, but I'm still not sure of the interior due to the considerable amount of modes it will take. I was thinking of the immortal words of Socrates who said... "I Drank What?!?!"
|
|
|
 Rank: Elite  Groups: registriert, Registered Joined: 20/03/2011 Posts: 2,356 Points: 7,122 Location: UK
|
A nice clean build Imp  looking great so far  Spencer
|
|
|
 Rank: Newbie Groups: Registered
Joined: 18/08/2015 Posts: 1 Points: 3 Location: Tampa, Florida
|
Impatience wrote:I also received the binder, but in all honesty have no idea how that binder is supposed to hold 100 books, or even how it works. I'm American for Christ's sake, we can do anything without explicit instructions! Heheheh (Picture of binder not included to reduce potential for instructional comments that will only serve to make this poster feel ignorant).
I just got my second shipment and binder today as well. I was equally stumped, but I had an idea how it should work. I didn't want to mess anything up so I started trolling the forums and then went to Google where I found this video. Hope it helps. **Note** I'm getting ready to go on a trip that will keep me away from home until the end of June next year, so I'm waiting to start the build until then. I'm only going to take out the tabs as I get the issues and leave the extra tabs with the first shipment so I don't lose them.  Youtube Binder Video Here Youtube Binder Video Here
|
|
|
Rank: Pro Groups: Registered
Joined: 22/04/2015 Posts: 134 Points: 378 Location: San Diego, CA
|
Okie dokie fans, I've been gone a while with a really busy July and August, but I'm back to try and get myself back on track. I've got 3 shipments waiting for me, which is a little daunting, but we'll get through this one issue at a time. Several weeks ago I did Issue 13, so here is a quick update on that one! More to come soon I hope. (Ohh and those dreaded cushions are all here waiting for me to put them together for the corridors...eeeek!!) Issue 13This issue was pretty quick and easy, with most of it just gluing things into their final resting places, adding a few walls, and continuing to work on additional components in the hold. The only real issue I had was placing the science station as the glue dried REALLY fast and I wasn't able to get it fully seated in time, so there is a little gap between the bottom of it and the floor, but ohh well, you can barely tell. Here's a photo of the hold so far: 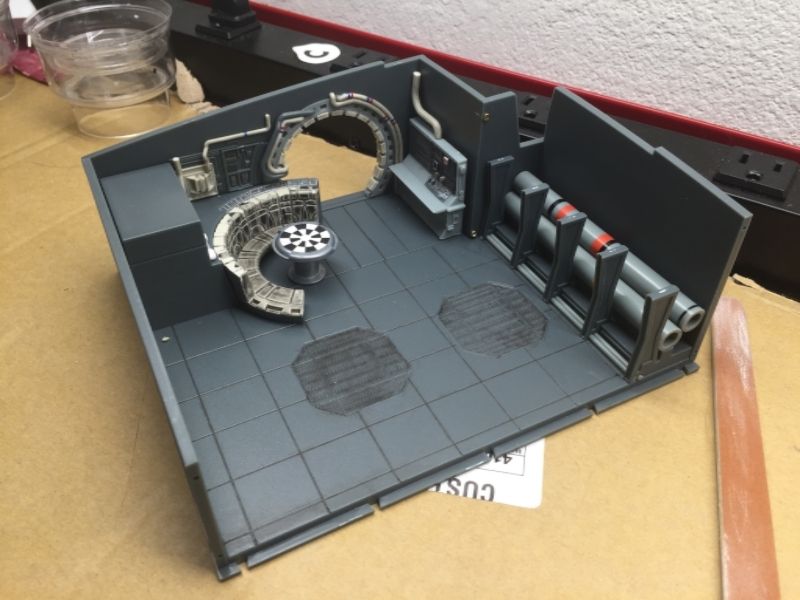 Hopefully soon I'll be able to post some progress of the other issues in this 4th installment. Great to be back with you guys!!!! Current Build: Millennium FalconWish List: Lamborghini Countach LP 500S, Red Bull Racing RB7
|
|
|
Rank: Semi-Pro Level 2 Groups: Registered
Joined: 04/09/2015 Posts: 92 Points: 256 Location: Atlantis
|
Im really enjoying your progress thus far and your build in general. I like the approach you are taking especially since a number of us are newbies when it comes to modeling. Thanks for the tips about the screws. I could see myself completing the assembly of the metal framework only to have it collapse outright. Your MF is really taking shape nicely.
|
|
|
Rank: Super-Elite Groups: Registered
Joined: 27/01/2014 Posts: 5,060 Points: 14,980
|
Just to make you aware the screws that screw the little wall threat the pipes are touching to the wall the computer is touching will be replaced by lengths of plastic that glue into the screw holes holes to avoid have screws visible once assembled
|
|
|
Rank: Super-Elite Groups: Registered
Joined: 17/12/2013 Posts: 3,982 Points: 11,974 Location: NY, USA
|
Looking great Impatience.really clean build
|
|
|
Rank: Pro Groups: Registered
Joined: 22/04/2015 Posts: 134 Points: 378 Location: San Diego, CA
|
davetwin wrote:Just to make you aware the screws that screw the little wall threat the pipes are touching to the wall the computer is touching will be replaced by lengths of plastic that glue into the screw holes holes to avoid have screws visible once assembled Ahh, good to know! I really didn't like the stress marks that showed up after putting those screws in either. I'll leave them in for now, but look forward to taking them out and replacing with plastic pins. Thanks for looking in!! Current Build: Millennium FalconWish List: Lamborghini Countach LP 500S, Red Bull Racing RB7
|
|
|
Rank: Pro Groups: Registered
Joined: 22/04/2015 Posts: 134 Points: 378 Location: San Diego, CA
|
Thanks everyone for looking in and your kind comments! You guys keep me going! So, I went ahead and did another issue tonight. I almost did 2, but the next issue (15) has 3 of those darn corridor pieces, and I couldn't bring myself to do it tonight. So without further ado... Issue 14First picture here is just all of the relevant parts that will come together in this issue. There were more pieces in the pack, but they don't get used until later, so why waste your time with them :) 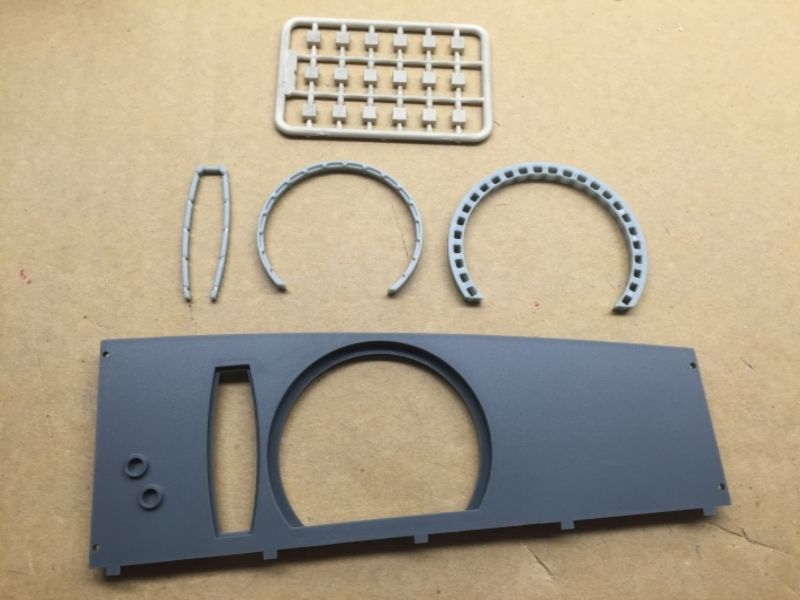 Overall looks like this is gonna be a pretty simple one. A little time consuming with the cutting, sanding, and glueing of the bumper cushions, but hey, no pain no gain!!! To put in the little doorway I was a little hesitant to put glue all the way around and then have to fiddle it into place (especially since I haven't really glued anything in weeks). My approach was to just glue in the narrow top part, leaving the sides loose. Then once that set, I bent in each of the sides in turn, applied a little glue, and pushed it back in place. By having the top already glued everything held together nicely. 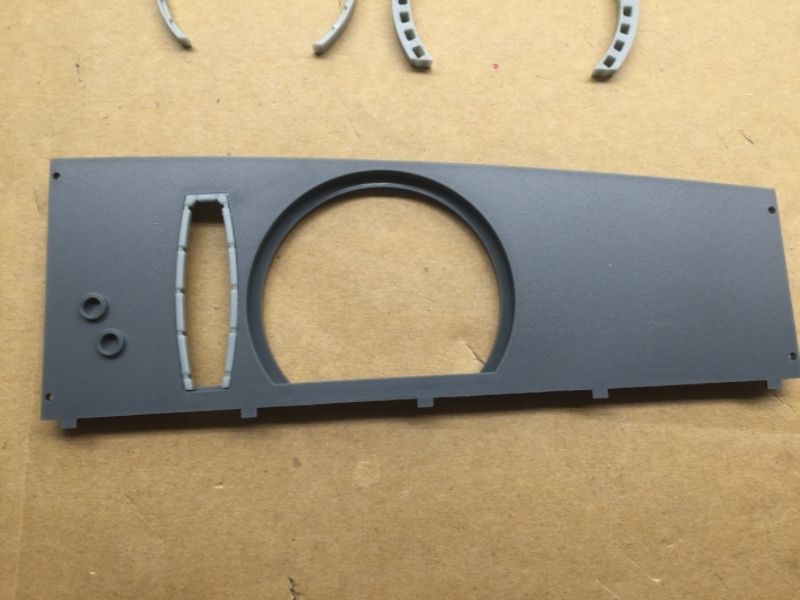 Next I glued and set the outer hallway piece (don't always know what to call these things) 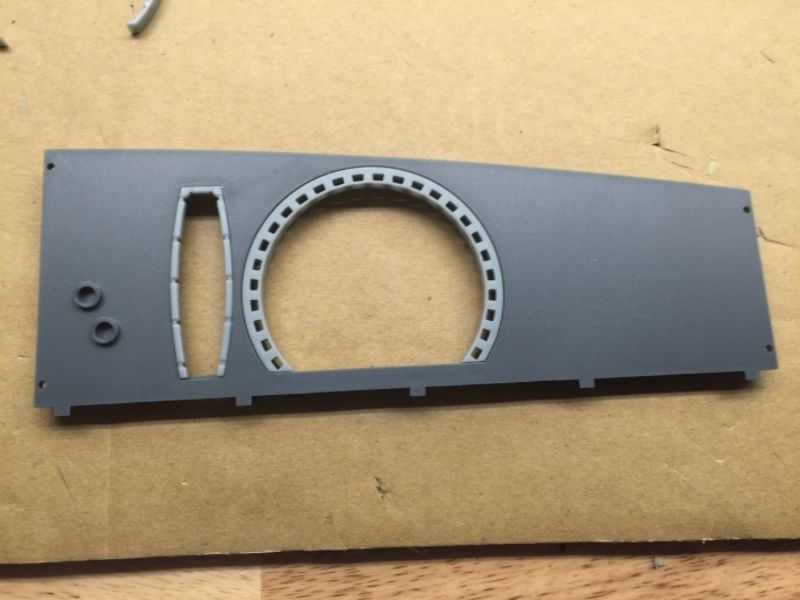 And finally, not shown here, the assembly of the bumpers exactly the same as what was done in Issue 10. Sanding down the edges of each of the little pieces to get rid of the extra sprue plastic is kind of a pain, but the results are worth it. This completes Issue 14. A little view of my workbench setup where I have Empire Strikes Back playing in the background to keep me properly motivated :) (Inside the Falcon of course)  Current Build: Millennium FalconWish List: Lamborghini Countach LP 500S, Red Bull Racing RB7
|
|
|
Rank: Super-Elite Groups: Registered
Joined: 27/01/2014 Posts: 5,060 Points: 14,980
|
Coming along nicely 
|
|
|
Rank: Pro Groups: Registered
Joined: 22/04/2015 Posts: 134 Points: 378 Location: San Diego, CA
|
Well, I lied. While the Issue 15 parts do include more of the coridore bumpers, the instructions in Issue 15 are all about the plating and rib structure. YAY!!! I can procrastinate a little longer!!! Issue 15 - QUICK Update
So this one was just putting on 3 more pieces of the ribbing to the under side of the MF and then attaching the associated plating. Pretty straight forward, just remember to use the right screws!!!! Here is what it looks like afterwards. 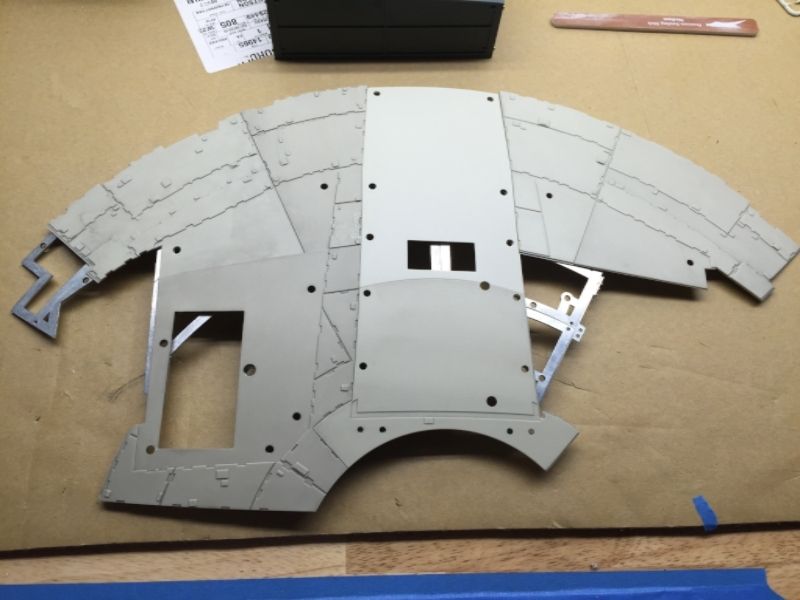 Ohh and I finally found a good solution for me to keep track of all of the extra screws that come in. I pop them out of those fancy little bags they come in and put them in these little boxes I got at the craft store. Pretty much just Tic-Tac boxes. Plenty left over to store little tidbits from other projects as well :)  Happy Building!!!! Current Build: Millennium FalconWish List: Lamborghini Countach LP 500S, Red Bull Racing RB7
|
|
|
|
Guest
|
 UK
UK

