|
|
 Rank: Vice-Master   Groups: Registered
Joined: 05/03/2015 Posts: 561 Points: 1,713 Location: South Carolina
|
|
|
|
 Rank: Pro   Groups: Registered
Joined: 06/08/2015 Posts: 276 Points: 817 Location: Monrovia, Ca
|
Looks very nice. I really like the "kissing booth". I wish I had done a bit more to mine, but it's already done. Definitely like the hairspray method for creating the chipped paint effect. Stephen Current Builds: HMS Sovereign of the Seas /// Lamborghini Countach /// Eaglemoss BTTF DeLorean
Finished Builds: Millennium Falcon
|
|
|
Rank: Vice-Master Groups: Registered
Joined: 05/03/2015 Posts: 561 Points: 1,713 Location: South Carolina
|
scraperjawa wrote:Looks very nice. I really like the "kissing booth". I wish I had done a bit more to mine, but it's already done. Definitely like the hairspray method for creating the chipped paint effect.
Stephen Thanks bro... I like the hairspray method myself. But on the top hull, I may use the Salt Method... same technique, only using water and sea salt then just rub off. Gives a totally different effect! :) There's been so many people making this kit and making upgrades for it, it's been difficult not to just glue everything together and be done with it. But I've been biding my time and trying to make things look the way I want them too before I commit to anything permanent. Which means I've got parts all over my workbench just waiting for me to glue them down! But at least I'm slowly getting there! :) I don't think I've actually glued anything down permanently yet. Just in case I change my mind or find a better way of doing something! Ya never know! :)
|
|
|
|
|
Coming on very nicely, nice to see it taking shape. I agree, there is no rush with this project, and taking your time to get this exactly how you want them. I look forward to seeing your progress. Keep up the good work Mark
|
|
|
Rank: Vice-Master Groups: Registered
Joined: 05/03/2015 Posts: 561 Points: 1,713 Location: South Carolina
|
Markwarren wrote:Coming on very nicely, nice to see it taking shape. I agree, there is no rush with this project, and taking your time to get this exactly how you want them. I look forward to seeing your progress.
Keep up the good work
Mark Thanks bro.... so glad you enjoy it! :)
|
|
|
Rank: Vice-Master Groups: Registered
Joined: 05/03/2015 Posts: 561 Points: 1,713 Location: South Carolina
|
Just like many of you, I have been watching other's build this same model kit with awe and amazement. I've watched how some people tackle a particular problem with detail or inaccuracy and think to myself why didn't I think of that. I've seen some fantastical elaborate ways of solving problems that come out looking extremely incredible... but I think to myself why go thru all that trouble. Well, here's my solution to a problem with the blaster holes on the top hull behind the radar dish. I don't know why, but it seems as if the scan of those "bullet holes" came out as indentions. Almost as if they are some kind of computer artifact that the computer couldn't quite interpret and just said fudge it and made them all even. Now, I've seen some builders actually cut these holes out completely, use a soldering iron to melt the plastic, burn the plastic... heck... I've even seen some people replace the entire panel itself with their own scratch built part. The problem they all run into is the metal framework behind them. You could cut the framework or try to work around it. Me... my solution doesn't damage the plastic panel or the framework at all. All it takes is a little Epoxy Putty (also known as Apoxie Sculpt, Aves, Magic Sculpt, or any 2 part Epoxy Clay Compound that you mix equal parts together and it hardens by itself)! Here's the panel I'm talking about... 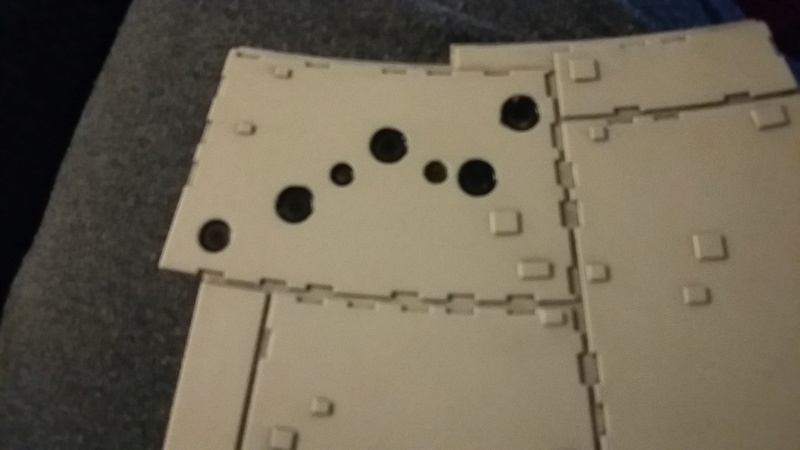 Now notice how nice and symmetrical these blaster holes are? Even thou all the "holes" are in the proper place and position... they don't look anything like they should on the actual prop here ( image of the actual prop on display at Star Wars Identities in France photographed by Jean-Marc Deschamps & Olivier Cabourdin)...  So here's my method... take a small ball of putty and place it into the hole. 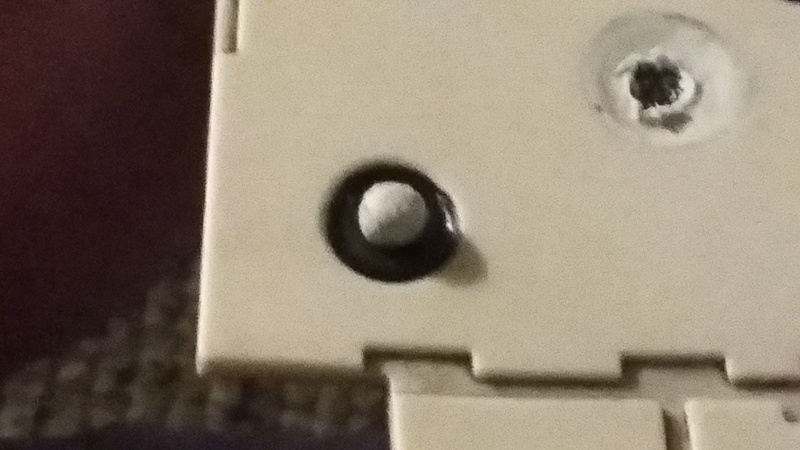 Squish it down until it fills the entire hole... 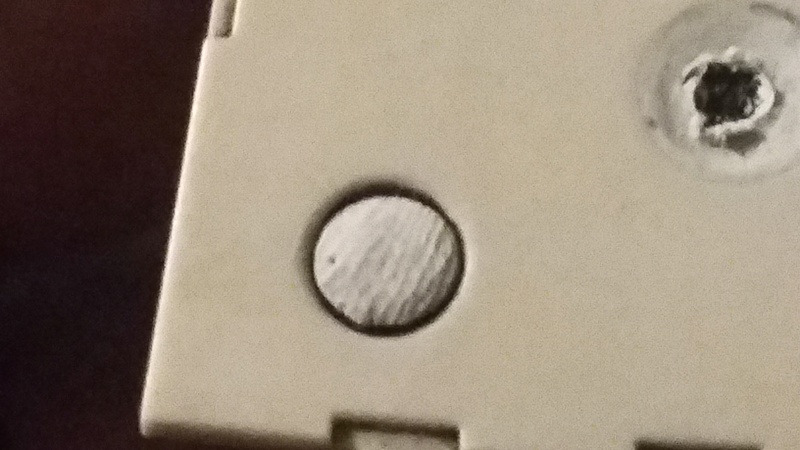 then wet your finger and make a depression or dimple in the putty. Smooth it out so that all the edges are even with the top edges of the hole and then take a hobby knife or whatever else that you use for fine detail work and stab it in the middle of the putty. Slowly and gently move it back and forth to create a hole in the middle wiping away the putty from the black inside the hole. 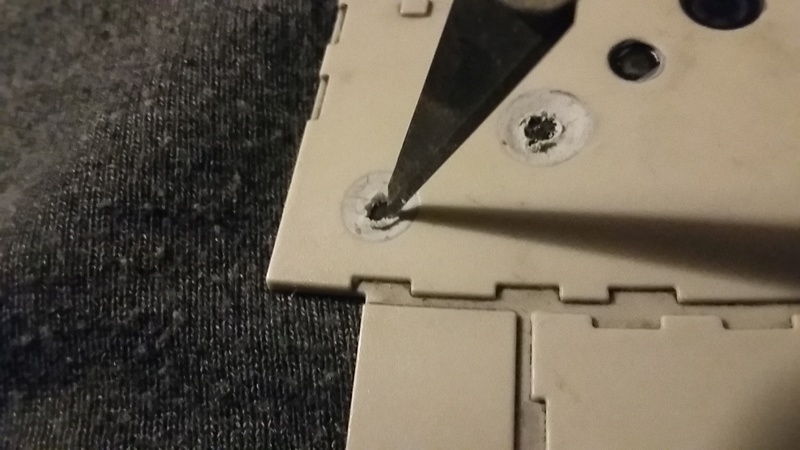 You can work it back and forth to create a realistic hole but not too big. Remember the hole is only in the center of the depression. Use the pushed aside putty gathered around the hole you made to create the torn flaps. Notice that there are 2 completely filled holes here just like on the original prop. Repeat the same process for each hole and set it aside for the putty to cure and harden. Paint to taste! 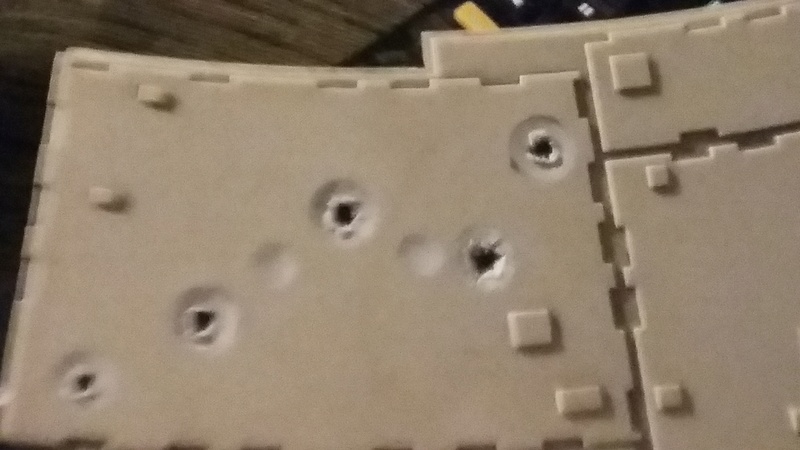 Viola... you've just created realistic blaster holes without cutting, marring, maiming, melting, defiling or otherwise destroying the plastic whatsoever (however you can berate the plastic and call it names to your hearts content because it doesn't know any better, just make sure to kiss and make up afterward!) and you never have to worry about the framing behind it! :) When it's dry and all painted up you'll see a world of difference! Hope this little tip helps! Lemme know what you think!
|
|
|
|
|
Nice idea, for those not happy with cutting or melting the plastic, and excellent results too. This is one area that needed attention rather than looking like some beauty spots. as you know I melted and cut into them on my model, but I did practise on some spare hull sections first. Mark
|
|
|
Rank: Vice-Master Groups: Registered
Joined: 05/03/2015 Posts: 561 Points: 1,713 Location: South Carolina
|
Markwarren wrote:Nice idea, for those not happy with cutting or melting the plastic, and excellent results too. This is one area that needed attention rather than looking like some beauty spots.
as you know I melted and cut into them on my model, but I did practise on some spare hull sections first.
Mark
I love how your's came out too. Very nicely done. Tonight I'll probably paint this and do some modding to it a bit to see how it all looks with paint. Wish me luck!
|
|
|
Rank: Vice-Master Groups: Registered
Joined: 05/03/2015 Posts: 561 Points: 1,713 Location: South Carolina
|
|
|
|
 Rank: Amateur Level 1 Groups: Registered
Joined: 18/04/2015 Posts: 31 Points: 93 Location: SW Virginia, USA
|
Gorgeous! Amazing work LrdSatyr8. I'm getting ready to open up Issue 5 and see how close to 8 I can get this afternoon. As I was looking through this last page of your build I noticed that you've held off on gluing certain parts of your Falcon. Everything I've done so far is still loose and not fully tightened. I may keep holding off on gluing certain things now that I see someone way ahead of me hasn't glued everything in place.
|
|
|
|
|
Great work, I have bought some figures to go into my falcon when finished, just haven't got around to painting them yet. I feel a very large magnifying glass coming out for that.
|
|
|
 Rank: Super-Elite    Groups: Registered
Joined: 27/01/2014 Posts: 5,060 Points: 14,980
|
Great work on the R2 paint job, there's a lot of tiny details on there which couldn't have been easy.
|
|
|
Rank: Vice-Master Groups: Registered
Joined: 05/03/2015 Posts: 561 Points: 1,713 Location: South Carolina
|
jedieb wrote:Gorgeous! Amazing work LrdSatyr8. I'm getting ready to open up Issue 5 and see how close to 8 I can get this afternoon. As I was looking through this last page of your build I noticed that you've held off on gluing certain parts of your Falcon. Everything I've done so far is still loose and not fully tightened. I may keep holding off on gluing certain things now that I see someone way ahead of me hasn't glued everything in place. I'm up to issue 76 and have glued very little together. I always find something that I want to fix or make better. I'm almost at the point where the interior is just about ready to be glued thou, but here's my checklist of things to do before I start whipping out the glue... 1) Run the fiber optics and LEDs thru the nav computer, chess table, bunk, and seating area. 2) Finish the piping and details on the walls 3) Put my new corridor lights in and run the wiring. 4) Wire and light my turret tube 5) Wait for the platform to arrive for attaching the floor to the bottom hull so I can modify it to add the floor pits. 6) Run the wire/piping thru the large outer rings of both corridors. 7) Consider whether to make the chess pieces out of putty. Still so much to do, and most of it is a waiting game. But one thing I learned early on, is never glue anything together hastily... unless you are absolutely sure that's where you want it to stay. About the only things I've glued at this point are a few greeblies on the cockpit tube and some on the bottom hull.
|
|
|
Rank: Vice-Master Groups: Registered
Joined: 05/03/2015 Posts: 561 Points: 1,713 Location: South Carolina
|
Markwarren wrote:Great work, I have bought some figures to go into my falcon when finished, just haven't got around to painting them yet. I feel a very large magnifying glass coming out for that. Hey Mark... invest in a pair of quality jeweler's visors with the magnifying lenses. Trust me... they come in SOOOOOOOOO handy for doing the small stuff anymore. I know when I was a kid I was able to write on a grain on rice, but as I've gotten older, so has my eyesight. These things are INVALUEABLE for seeing the small stuff and doing tiny work like this. Trust me... you'll be glad you did! 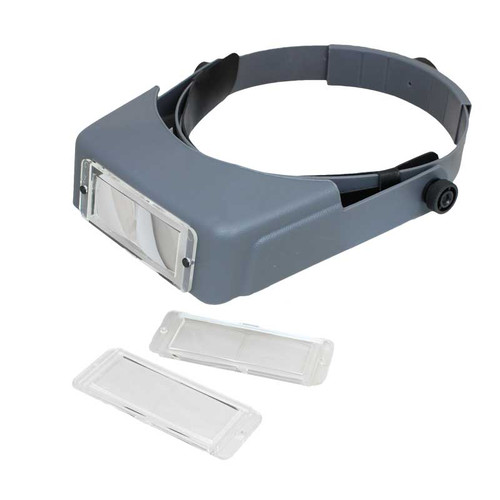
|
|
|
Rank: Vice-Master Groups: Registered
Joined: 05/03/2015 Posts: 561 Points: 1,713 Location: South Carolina
|
davetwin wrote:Great work on the R2 paint job, there's a lot of tiny details on there which couldn't have been easy. You can say that again. I ended up using an old paint brush that I cut all the hairs off of except five. Made sure they were nice and straight then used it for painting all the details on both of them... all by hand! Try doing it with an airbrush! I dare ya! LOL
|
|
|
|
|
Thanks for the info, I'll look into that, good timing, just cancellened my 3 foot arm extension, these look a better option. Cheers Mark
|
|
|
Rank: Vice-Master Groups: Registered
Joined: 05/03/2015 Posts: 561 Points: 1,713 Location: South Carolina
|
Markwarren wrote:Thanks for the info, I'll look into that, good timing, just cancellened my 3 foot arm extension, these look a better option.
Cheers Mark I have a magnifying lamp with a light on it. It's great for some things, but becomes annoying when you're sitting at your desk and if you're like me you don't always paint or do things in a particular position. My ex said I look like a contortionist sometimes in the way my body gets in trying to get the paintbrush in certain ways. Kinda difficult to do when using a fixed magnifier. With the visor it don't matter what position I'm in, I can see everything in any position I'm in.
|
|
|
Rank: Amateur level 2 Groups: Registered
Joined: 24/08/2016 Posts: 45 Points: 138 Location: Maryland
|
An alternative is to shop online for cheap assorted reading glasses. I bought an assortment of 5 pairs ranging from 1.0 to 2.75x magnification for about $20US. It's harder to find the higher magnification (4x+) but I don't have to touch my work to my nose if I use the lower strengths (my nose it pretty big).
|
|
|
Rank: Amateur Level 1 Groups: Registered
Joined: 18/04/2015 Posts: 31 Points: 93 Location: SW Virginia, USA
|
LrdSatyr8 wrote:jedieb wrote:Gorgeous! Amazing work LrdSatyr8. I'm getting ready to open up Issue 5 and see how close to 8 I can get this afternoon. As I was looking through this last page of your build I noticed that you've held off on gluing certain parts of your Falcon. Everything I've done so far is still loose and not fully tightened. I may keep holding off on gluing certain things now that I see someone way ahead of me hasn't glued everything in place. I'm up to issue 76 and have glued very little together. I always find something that I want to fix or make better. I'm almost at the point where the interior is just about ready to be glued thou, but here's my checklist of things to do before I start whipping out the glue... 1) Run the fiber optics and LEDs thru the nav computer, chess table, bunk, and seating area. 2) Finish the piping and details on the walls 3) Put my new corridor lights in and run the wiring. 4) Wire and light my turret tube 5) Wait for the platform to arrive for attaching the floor to the bottom hull so I can modify it to add the floor pits. 6) Run the wire/piping thru the large outer rings of both corridors. 7) Consider whether to make the chess pieces out of putty. Still so much to do, and most of it is a waiting game. But one thing I learned early on, is never glue anything together hastily... unless you are absolutely sure that's where you want it to stay. About the only things I've glued at this point are a few greeblies on the cockpit tube and some on the bottom hull. Thanks for the advice! I'm copying this checklist and keeping it for future reference!
|
|
|
Rank: Vice-Master Groups: Registered
Joined: 05/03/2015 Posts: 561 Points: 1,713 Location: South Carolina
|
jedieb wrote:Thanks for the advice! I'm copying this checklist and keeping it for future reference! Heyyyyyyyy... go make your own checklist! LOL... Sorry... couldn't resist... I don't mind, but that's what i have yet to do with mine. You may have different things that you are going to do with yours. I tend to come up with a checklist of all the stuff I need to do and work on each item until its done then move onto the next one. Keeps me focused and organized otherwise I start losing stuff! :)
|
|
|
|
Guest (2)
|
 UK
UK

