|
|
 Rank: Semipro Level 1 Groups: Registered
Joined: 08/02/2021 Posts: 65 Points: 195 Location: Spain
|
Hi all!
I'm a huge fan of the Millennium Falcon, like all of you.
I've started my passion when I was 14 years old, just on the moment I've purchased my very first Millennium Falcon model kit, the old MPC/ERTL Millennium Falcon (which I still owns 44 years later!).
I've started painting it but I wanted to improve some stock parts, like the cockpit, the cannons, the landing gear and a large list of parts. So I've started scratbuilding them by hand with plastic, styrene, metal sheets and a lot of craftmanship.
But I don't know why -maybe tired of scratchbuilding-, I left the modelling for some years...
Surprisingly I've started again with it ten years ago, in 2013, just when 3D printing has started to be "popular".
So thanks to my knowledge about the Millennium Falcon, 3D design and 3D printing -with Shapeways-, I've starting modelling my first upgrade for my old MPC/ERTL Millennium Falcon, the cockpit.
And this way I've started designing 3D printed upgrades for the Millennium Falcon, and I keep designing parts for a big bunch of Star Wars models, mainly the Millennium Falcon kits, included our De Agostini Millennium Falcon. And this is a magnific huge kit than can be improved too. Yes, it can be!! But how?
So the answer to the question "How to improve your DeAgo Millennium Falcon?" there are several possibilities:
-Scratchbuild yourself the parts you want
-3D design and 3D print the parts you need
-Buy the available aftermarket 3D printed upgrades
-Add more lighting
-Repaint the model and add new decals
-Add more weathered effects
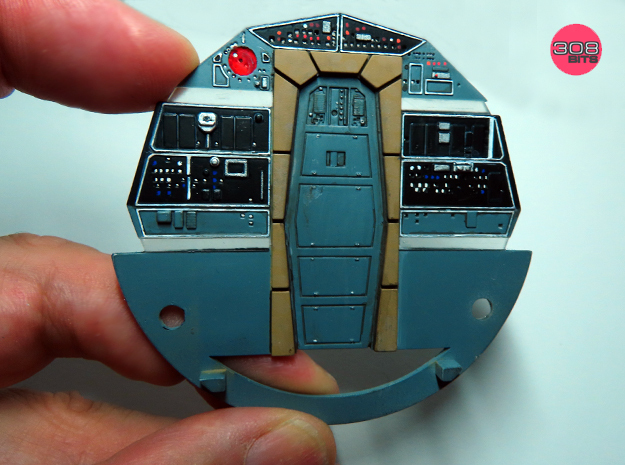
I will be posting here more tips about improving the DeAgo Falcon. On the attached image you can see my first 3D design for the MPC Millennium Falcon, the upgrade for the cockpit.
Many thanks for reading! TonyRR attached the following image(s): TonyRR ModelKitsUpgradesHigly detailed 3D printed aftermarket parts for scifi kits
|
|
|
Rank: Administration  Groups: Administrator, Administrators, Forum Support Team, Global Forum Support, Global Forum Support Team, Moderator, Official Builds Joined: 24/08/2009 Posts: 1,928 Points: 5,796 Location: UK
|
Hi All,  I`d like to thank Tony for the added input to the forum, that I`m sure we will all benefit from. Tony does make some amazing enhancements for the Falcon and I wish him luck for the future. Regards Derek Admin.
|
|
|
Rank: Semipro Level 1 Groups: Registered
Joined: 08/02/2021 Posts: 65 Points: 195 Location: Spain
|
Hi all again!
To take advantage of lighting you can get some parts of the cockpit or the turret well in translucent plastic. You will have to mask the zones where you need the light pass through. You can use masking tape and also liquid mask, that's like a liquid silicone that get solid once applied. These parts can be drilled with tiny holes for fiber optics or maybe you can play with unpainted buttons.
You can see my 3D printed cockpit backwall for the DeAgo Millennium Falcon printed in clear resin, and with the light bars and nav computer masked, ready for paint. Of course, the back of the parts must be masked too, and painted in black, with two coats, to block the light.
I hope you will like it!! TonyRR attached the following image(s): TonyRR ModelKitsUpgradesHigly detailed 3D printed aftermarket parts for scifi kits
|
|
|
Rank: Semipro Level 1 Groups: Registered
Joined: 08/02/2021 Posts: 65 Points: 195 Location: Spain
|
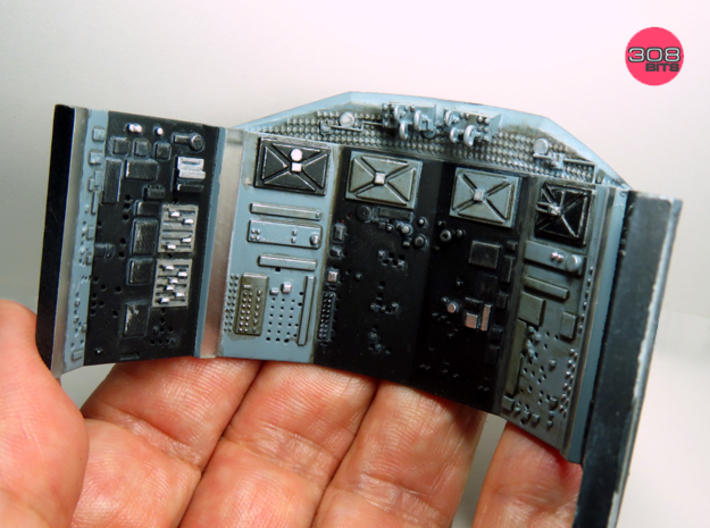
Following my prior post you can see my 3D printed upgrade for the DeAgo Millennium Falcon cockpit backwall with a coat of paint.
This is the first stage, masking the different parts of the backwall, in order to paint it in different colours. After that it comes the detail and weathering.
The light bars are still covered with masking tape.
Of course this upgrade is available in my 308 Bits Shapeways shop -without paint-!
I hope you will like it! TonyRR attached the following image(s): TonyRR ModelKitsUpgradesHigly detailed 3D printed aftermarket parts for scifi kits
|
|
|
Rank: Semipro Level 1 Groups: Registered
Joined: 08/02/2021 Posts: 65 Points: 195 Location: Spain
|
Hi all again!
This is the latest update on the backwall for the DeAgo Millennium Falcon cockpit. I've painted and weathered my 3D printed aftermarket backwall, adding all the possible details. No decals here, every detail is painted!
The next step will be adding fiber optics.
 TonyRR ModelKitsUpgradesHigly detailed 3D printed aftermarket parts for scifi kits
|
|
|
Rank: Administration Groups: Administrator, Administrators, Forum Support Team, Global Forum Support, Global Forum Support Team, Moderator, Official Builds Joined: 24/08/2009 Posts: 1,928 Points: 5,796 Location: UK
|
Thanks for another great update Tony.  Amazing paint work and not a decal in sight. WTG Regards delboy271155 (Derek) ADMIN
|
|
|
Rank: Semipro Level 1 Groups: Registered
Joined: 08/02/2021 Posts: 65 Points: 195 Location: Spain
|
admin wrote:Thanks for another great update Tony. Amazing paint work and not a decal in sight. WTG Regards delboy271155 (Derek) ADMIN Many thanks!! Trying my best! Cheers TonyRR ModelKitsUpgradesHigly detailed 3D printed aftermarket parts for scifi kits
|
|
|
Rank: Semipro Level 1 Groups: Registered
Joined: 08/02/2021 Posts: 65 Points: 195 Location: Spain
|
Back again with a new hint to make better your DeAgo Falcon cockpit!!
I've improved it -as you can do!!- with my 3D printed aftermarket De Agostini Millennium Falcon cockpit upperwall.
In this case I've designed a correct upperwall because the stock one is too short. This is because the cabin seen on the A New Hope is shorter than the one created by The Empire Strikes Back, the 32" Falcon created for the Ep. V., that's the DeAgo Falcon.
So I've designed and printed in clear resin a new cockpit upperwall, because I wanted to illuminate the cockpit light bars.
And you can see how it looks my upperwall just printed in clear resin.
On a new post I will shot it primed, and ready to be painted.
Of course, you can buy it in my 308 Bits Shapeways shop.
I hope you will like it!
 TonyRR attached the following image(s): TonyRR ModelKitsUpgradesHigly detailed 3D printed aftermarket parts for scifi kits
|
|
|
Rank: Semipro Level 1 Groups: Registered
Joined: 08/02/2021 Posts: 65 Points: 195 Location: Spain
|
If you have seen my earlier post about my 3D printed aftermarket cockpit upperwall for the Falcon, now it's the time to see the final result...
You can see the upperwall painted and weathered, ready to receive the fiber optics strands. I've detailed all the engraved greebles on it, trying to make them more realistic.
And you can see too the translucent light bars on the sides.
I hope you will like it!!
 TonyRR ModelKitsUpgradesHigly detailed 3D printed aftermarket parts for scifi kits
|
|
|
Rank: Semipro Level 1 Groups: Registered
Joined: 08/02/2021 Posts: 65 Points: 195 Location: Spain
|
I've show you my 3D printed backwall and upperwall cockpit aftermarket parts alone, so it's time to show them together. So here it goes!!
As you can see both parts assembled look really nice. And don't forget that everything is painted, no decals at all!!
Don't forget to add dark panel line accent colour on grey areas, and gray panel line accent colour on darker areas to pop up the details.
To paint the lines you can use some Posca paint markers. They work very well!!
So you can try too!!
Now starts the painful work of adding fiber optics... More to come!!
 TonyRR ModelKitsUpgradesHigly detailed 3D printed aftermarket parts for scifi kits
|
|
|
Rank: Semipro Level 1 Groups: Registered
Joined: 08/02/2021 Posts: 65 Points: 195 Location: Spain
|
For sure you have been waiting how my DeAgo 3D printed cockpit looks complete... So here it goes!!
On the attached image you can see my aftermarket cockpit, totally 3D printed -I haven't installed the upperwall-.
All you can see is painted, no decals.
So yes, you can upgrade the stock cockpit of the DeAgo Falcon, a lot!
The next step will be adding the fiber optics strands.
On another post I will show you how to paint the chromed parts of the main console.
I hope you will like it!! TonyRR ModelKitsUpgradesHigly detailed 3D printed aftermarket parts for scifi kits
|
|
|
Rank: Administration        Groups: Registered, Forum Support Team, Administrators, Global Forum Support Team, Moderator, Official Builds Joined: 09/11/2012 Posts: 8,386 Points: 24,249 Location: East midlands
|
Hi Tony, Really appreciate your efforts and input to help people upgrade the Falcon. Regards delboy271155 (Derek) Admin COME BACK GUY FAWKES "YOUR COUNTRY NEEDS YOU"
|
|
|
Rank: Semipro Level 1 Groups: Registered
Joined: 08/02/2021 Posts: 65 Points: 195 Location: Spain
|
delboy271155 wrote:Hi Tony, Really appreciate your efforts and input to help people upgrade the Falcon. Regards delboy271155 (Derek) Admin Many thanks for your kind words Derek!! I keep trying my best, when I have some spare time!! Cheers TonyRR ModelKitsUpgradesHigly detailed 3D printed aftermarket parts for scifi kits
|
|
|
Rank: Semipro Level 1 Groups: Registered
Joined: 08/02/2021 Posts: 65 Points: 195 Location: Spain
|
Hi again!
Today I will show you how to paint chromed details.

On the attached image you can see my 3D printed DeAgo cockpit console, with built in holes for 0.25 mm fiber optics. But this is not the meaning of this post but the chromed parts. On the image you can see that the yokes, levers, some buttons and the upper spheres are chromed. How to do it? Very easy! You must use a chrome paint marker. I've used the Molotow Liquid Chrome marker that works very well. It's expensive, but it's a charm!
Tip: shake it very well before use, to achieve the maximum chrome effect.
Tip: test the chrome on any plastic part before applying it to the console or any cockpit part. You must learn how to apply it correctly.
I hope that you will enjoy it!
Of course, my 3D printed console is on sale in my 308 Bits Shapeways shop.TonyRR ModelKitsUpgradesHigly detailed 3D printed aftermarket parts for scifi kits
|
|
|
Rank: Administration Groups: Administrator, Administrators, Forum Support Team, Global Forum Support, Global Forum Support Team, Moderator, Official Builds Joined: 24/08/2009 Posts: 1,928 Points: 5,796 Location: UK
|
Hi Tony, Those chrome parts really do pop. Thanks for the tip. Regards delboy271155 (Derek) Admin
|
|
|
Rank: Semipro Level 1 Groups: Registered
Joined: 08/02/2021 Posts: 65 Points: 195 Location: Spain
|
admin wrote:Hi Tony, Those chrome parts really do pop. Thanks for the tip. Regards delboy271155 (Derek) Admin Many thanks Derek! And Season's Greetings! TonyRR ModelKitsUpgradesHigly detailed 3D printed aftermarket parts for scifi kits
|
|
|
Rank: Semipro Level 1 Groups: Registered
Joined: 08/02/2021 Posts: 65 Points: 195 Location: Spain
|
|
|
|
Rank: Semipro Level 1 Groups: Registered
Joined: 08/02/2021 Posts: 65 Points: 195 Location: Spain
|
The most complicated part for adding fiber optics is on the cockpit upperwall. But you can do it!!
On the shots you can see my 3D printed aftermarket cockpit upperwall for the DeAgo Millennium Falcon with fiber optics installed. It's a real mess!!
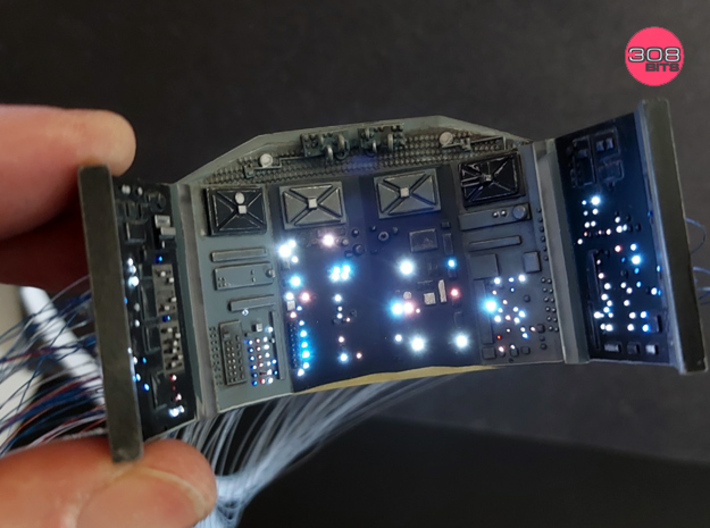
Pro Tip: to glue the fiber optics strands don't use CA glue. Use Humbrol Clearfix of Ammo UltraGlue.
Pro Tip II: And, as you can see, some strands are coloured. I've coloured them with bulb lacquer. So easy!

The final result is amazing!!
It worths it to try!! Of course you can find this part, as a raw part, in my 308 Bits Shapeways shop.
I hope you will like it!TonyRR ModelKitsUpgradesHigly detailed 3D printed aftermarket parts for scifi kits
|
|
|
Rank: Semipro Level 1 Groups: Registered
Joined: 08/02/2021 Posts: 65 Points: 195 Location: Spain
|
Hi all again!
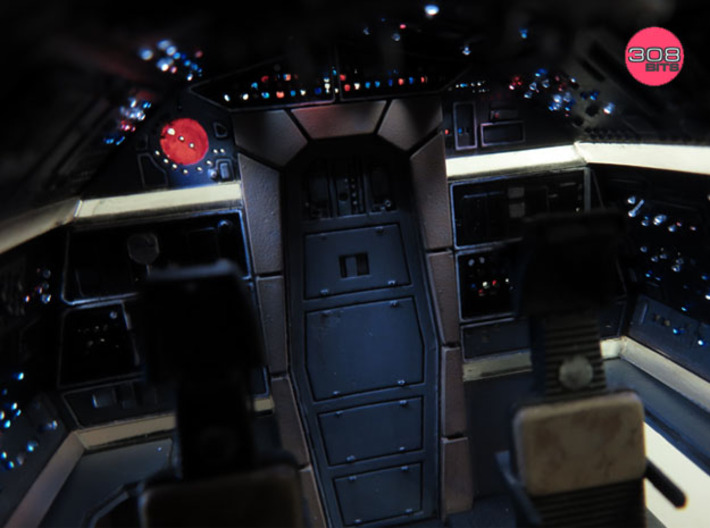
I want to show you this time a shot of the cockpit completed.
As you can see it seems the real damn thing on the hero shot!!! More shots to come!
I hope you will like it!
Remember that all that parts are on sale in my shop!
 TonyRR ModelKitsUpgradesHigly detailed 3D printed aftermarket parts for scifi kits
|
|
|
Rank: Semipro Level 1 Groups: Registered
Joined: 08/02/2021 Posts: 65 Points: 195 Location: Spain
|
Hi all again!
Only a very short post about my DeAgo cockpit completed. You can see my floor, seats, main console, side consoles and backwall, all 3D printed and designed by me, 308 Bits.

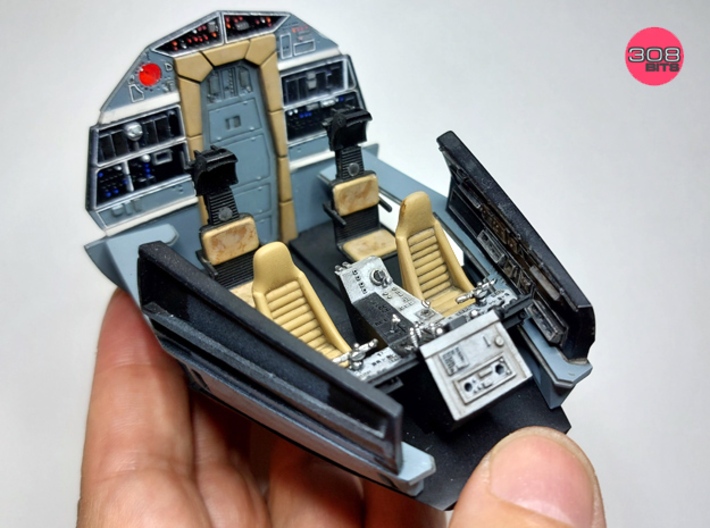
You can appreciate the paintjob; it has a lot of tiny details. No decals here!
Pro Tip: you need to buy very good tools to paint delicate details like Posca paint pencils or very precise brushes. Having masking tape on different widths it's a good idea also.
I hope you will like it!!TonyRR attached the following image(s): TonyRR ModelKitsUpgradesHigly detailed 3D printed aftermarket parts for scifi kits
|
|
|
|
Guest
|
 UK
UK

